In this chapter, we’ll walk through the essential steps to create your first PLC project using TIA Portal. By the end of this guide, you’ll have your hardware configured and ready to download your program to the PLC.
1. Add a CPU to Your Project
Start by opening the “Device & Networks“ view. On the left side, you’ll find the Hardware Catalog. From here, locate the exact model of your CPU. Once you find it, drag and drop it into the main area (the device view) to add it to your project.
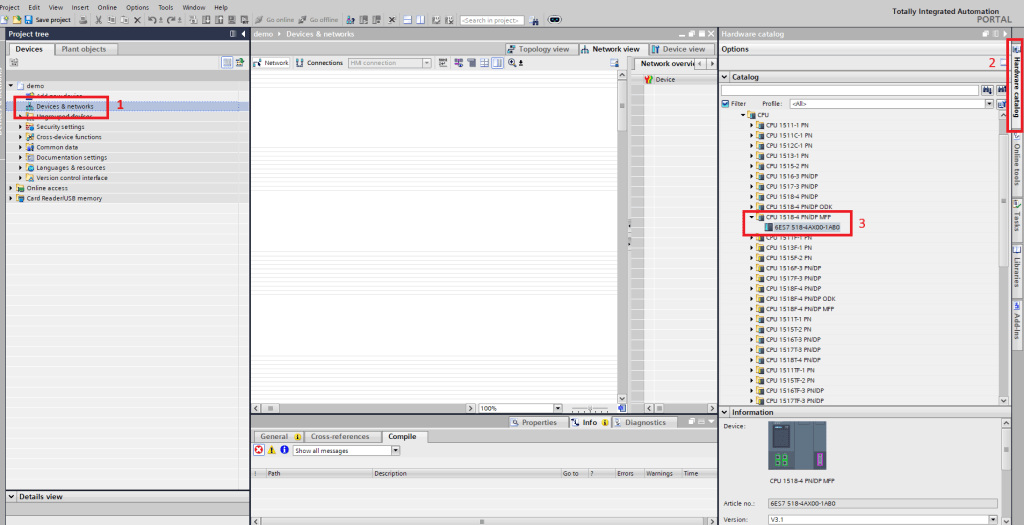
Adding CPU to Project
2. Configure PLC Security Settings
Here, you can choose to set a password for your PLC if desired. This adds a layer of protection to your hardware configuration.

PLC Security Settings
3. Assign Network Settings
Next, you’ll need to configure the network settings for the CPU:
- IP Address
- Subnet Mask
- PROFINET Device Name
These settings are essential for communication with your PC and other networked devices.
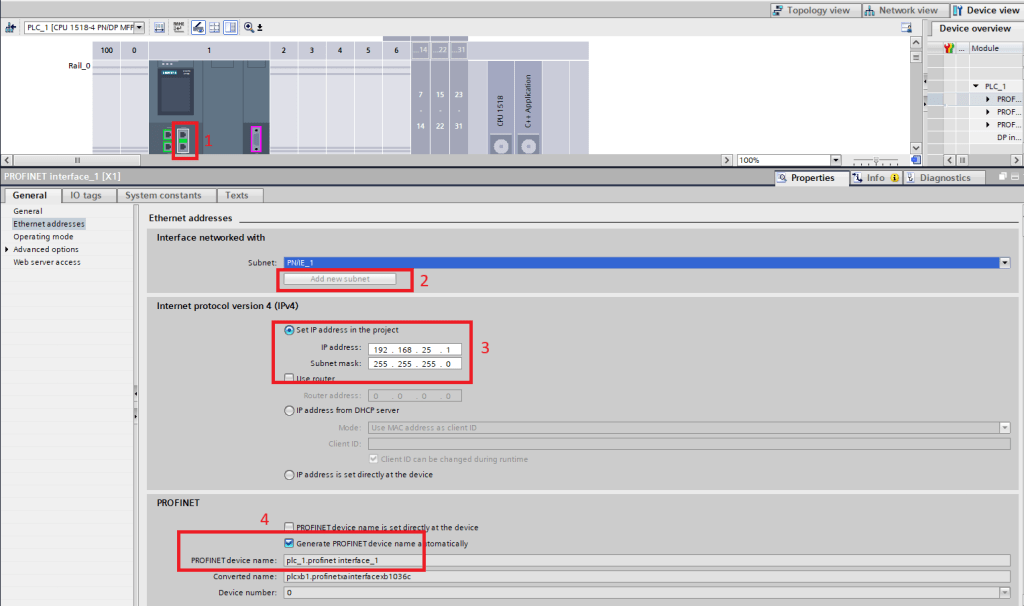
Assign Network Settigns
4. Access Control Settings
Once your CPU is added and configured, select it in the Device & Networks view and navigate to the “Access Protection” section
Here, you can choose whether to disable access control or set up user-based access depending on your project requirements
5. Compile Your Project
Before downloading, it’s important to compile the hardware configuration to check for any errors:
- Go to “Compile” and choose “Hardware (Rebuild All)”.
If the compilation is successful, you’re ready to download the configuration to the PLC.

Compile project
6. Download to the PLC
Connect to your PLC via the appropriate interface (e.g., Ethernet).
Click “Download to Device”, follow the steps to select your interface and transfer the configuration.


Downlod Project
7. Go Online
Once the download is complete, click “Go Online” to connect your project with the physical CPU.
You can now monitor, test, and debug your program in real time.

Go Online Button

Online View
8. Start or Stop the CPU
After going online, you can control the CPU operating mode directly from TIA Portal.
To start or stop the CPU
- At the top of the interface, in the “Online” tab, you’ll find the Start/Stop CPU controls.
- This section shows the current operating state of the CPU (e.g. RUN, STOP), and allows you to:
- Start the CPU (RUN mode)
- Stop the CPU (STOP mode)
💡It’s a good practice to set the CPU to “Stop” before downloading hardware or software changes, and then restart it once everything is updated.
Important Note: Hardware Switch Overrides
Some PLC CPUs have a physical RUN/STOP switch.
If this switch is set to STOP, the CPU will remain in STOP mode, even if you try to start it from TIA Portal.
⚠️ The physical switch always takes priority over the software commands.
Make sure the switch is set to RUN or RUN-P (if available) to allow software control.

Stop / Start CPU from TIA portal
Enabling System Memory & Clock Memory Bits
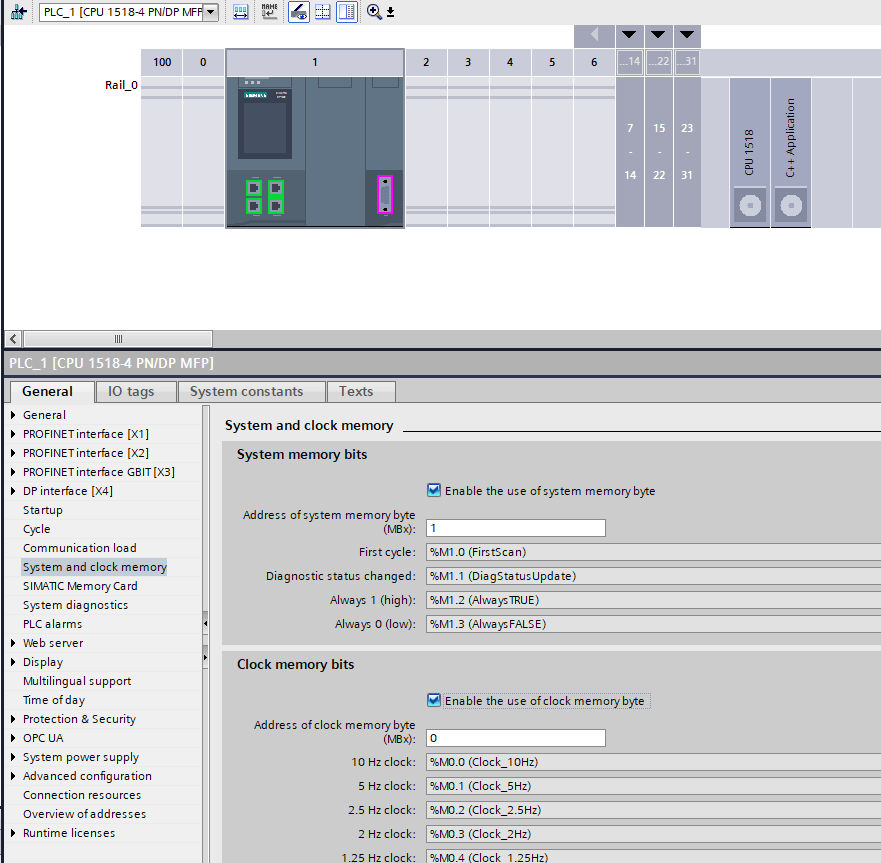
As an optional but very useful step, you can enable System Memory bits and Clock Memory bits in the CPU configuration:
- Select the CPU in your hardware view.
- In the Properties pane, go to “System and Clock Memory” (or similarly named setting).
- Tick (enable) the following options:
- Enable the use of system memory byte
- Enable the use of clock memory byte
By doing so:
- The system memory byte provides a few built‑in bits for common internal functions (e.g. first scan flag, diagnostic status changes, always‑1, always‑0).
- The clock memory byte divides that byte into 8 bits, each of which toggles automatically at a fixed frequency (from 0.5 Hz up to 10 Hz), useful for blinking signals, time‑based events, etc.
Keep in mind: you must choose a memory byte (MBx) address for those bits that does not conflict with your other M memory usage.
If you found this helpful, please consider supporting with a small donation. Thank you!
Leave a Reply